Introduction
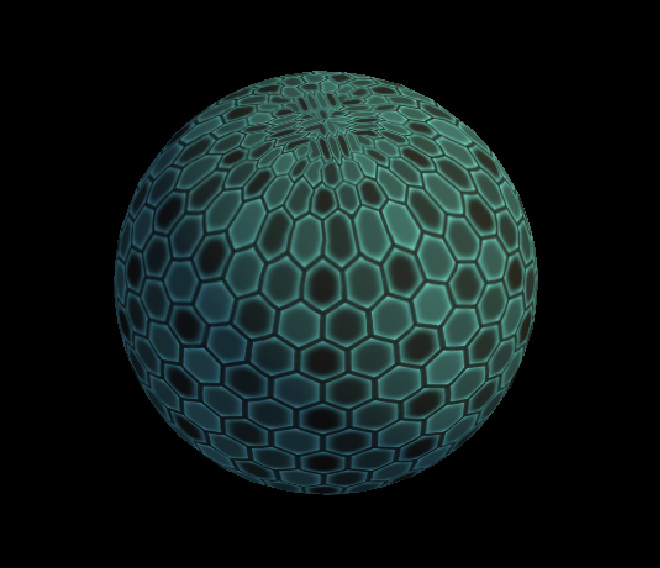
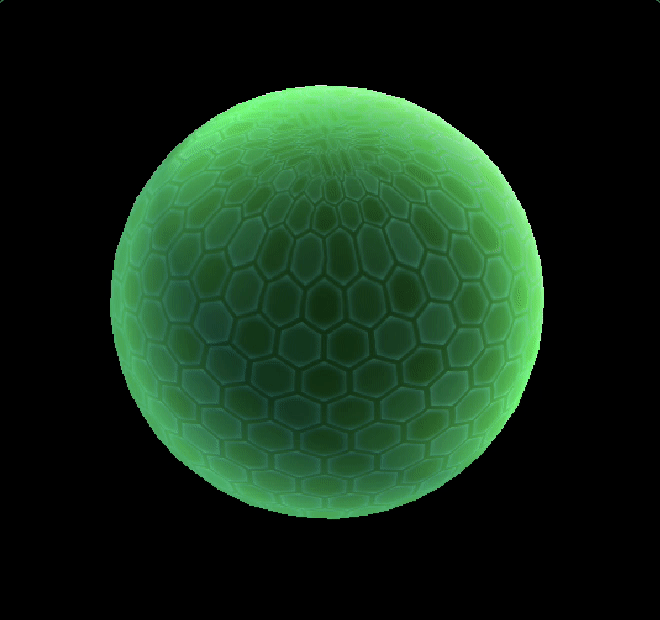
For the tanks game I’m making I wanted to have a power up where the player tank would get shielded. This post explains how I managed to do so. First let’s take a look at the final effect.
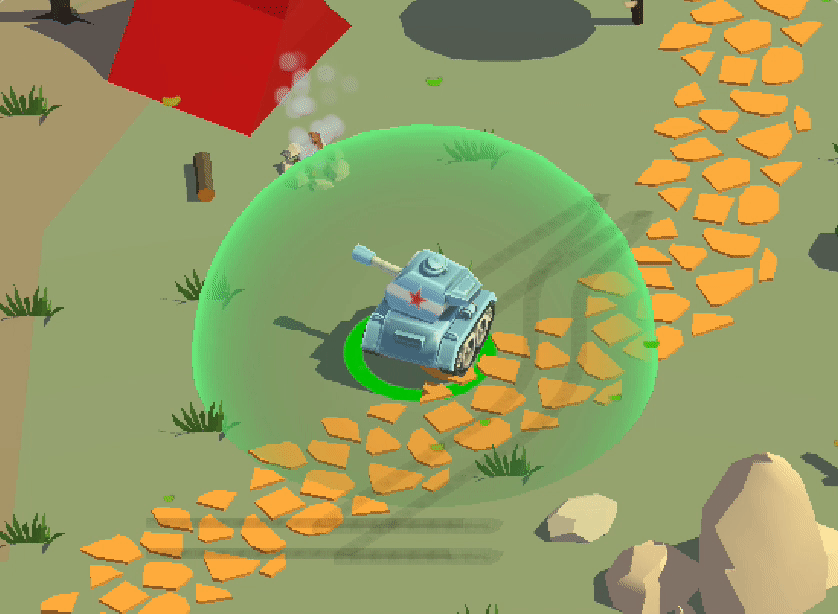
The shader is not complex and as such can render on mobile devices as well (iOS, Android). Open GL ES 2.0 is sufficent for rendering.
Prerequisites
With this post I’ll try to explain exactly how the shader is working so that next time you’ll be faced with a similar challenge you’ll hopefully be able to solve it the engineer’s way. If you’re just looking for the shader that’s perfectly fine but try to learn something from it.
Amplify Shader Editor (ASE)
The first thing that will greatly help is to know some basics about shaders. This was my first time using ASE but because I’ve spent some time writing simple shaders in the past it came very natural to me. So make sure that you know at least how shaders work and the basics of shader functions.
Simple maths
What shaders do most of the time is multiply, add, and transform data from one thing into another. Knowing addition, multiplication, clamping, etc. will come very handy. Also knowing basic linear algebra such as normals won’t hurt either.
Now that we’ve gotten that out of the way let’s dig in!
Shader structure
First let’s talk about what we want our shader to do:
- Support for custom colors along with a texture
- Support for a seconday texture which can be used for a nice panning effect
- Support for pulsation ie. expanding and shrinking of the material
Let’s look at how this looks in the finished shader:
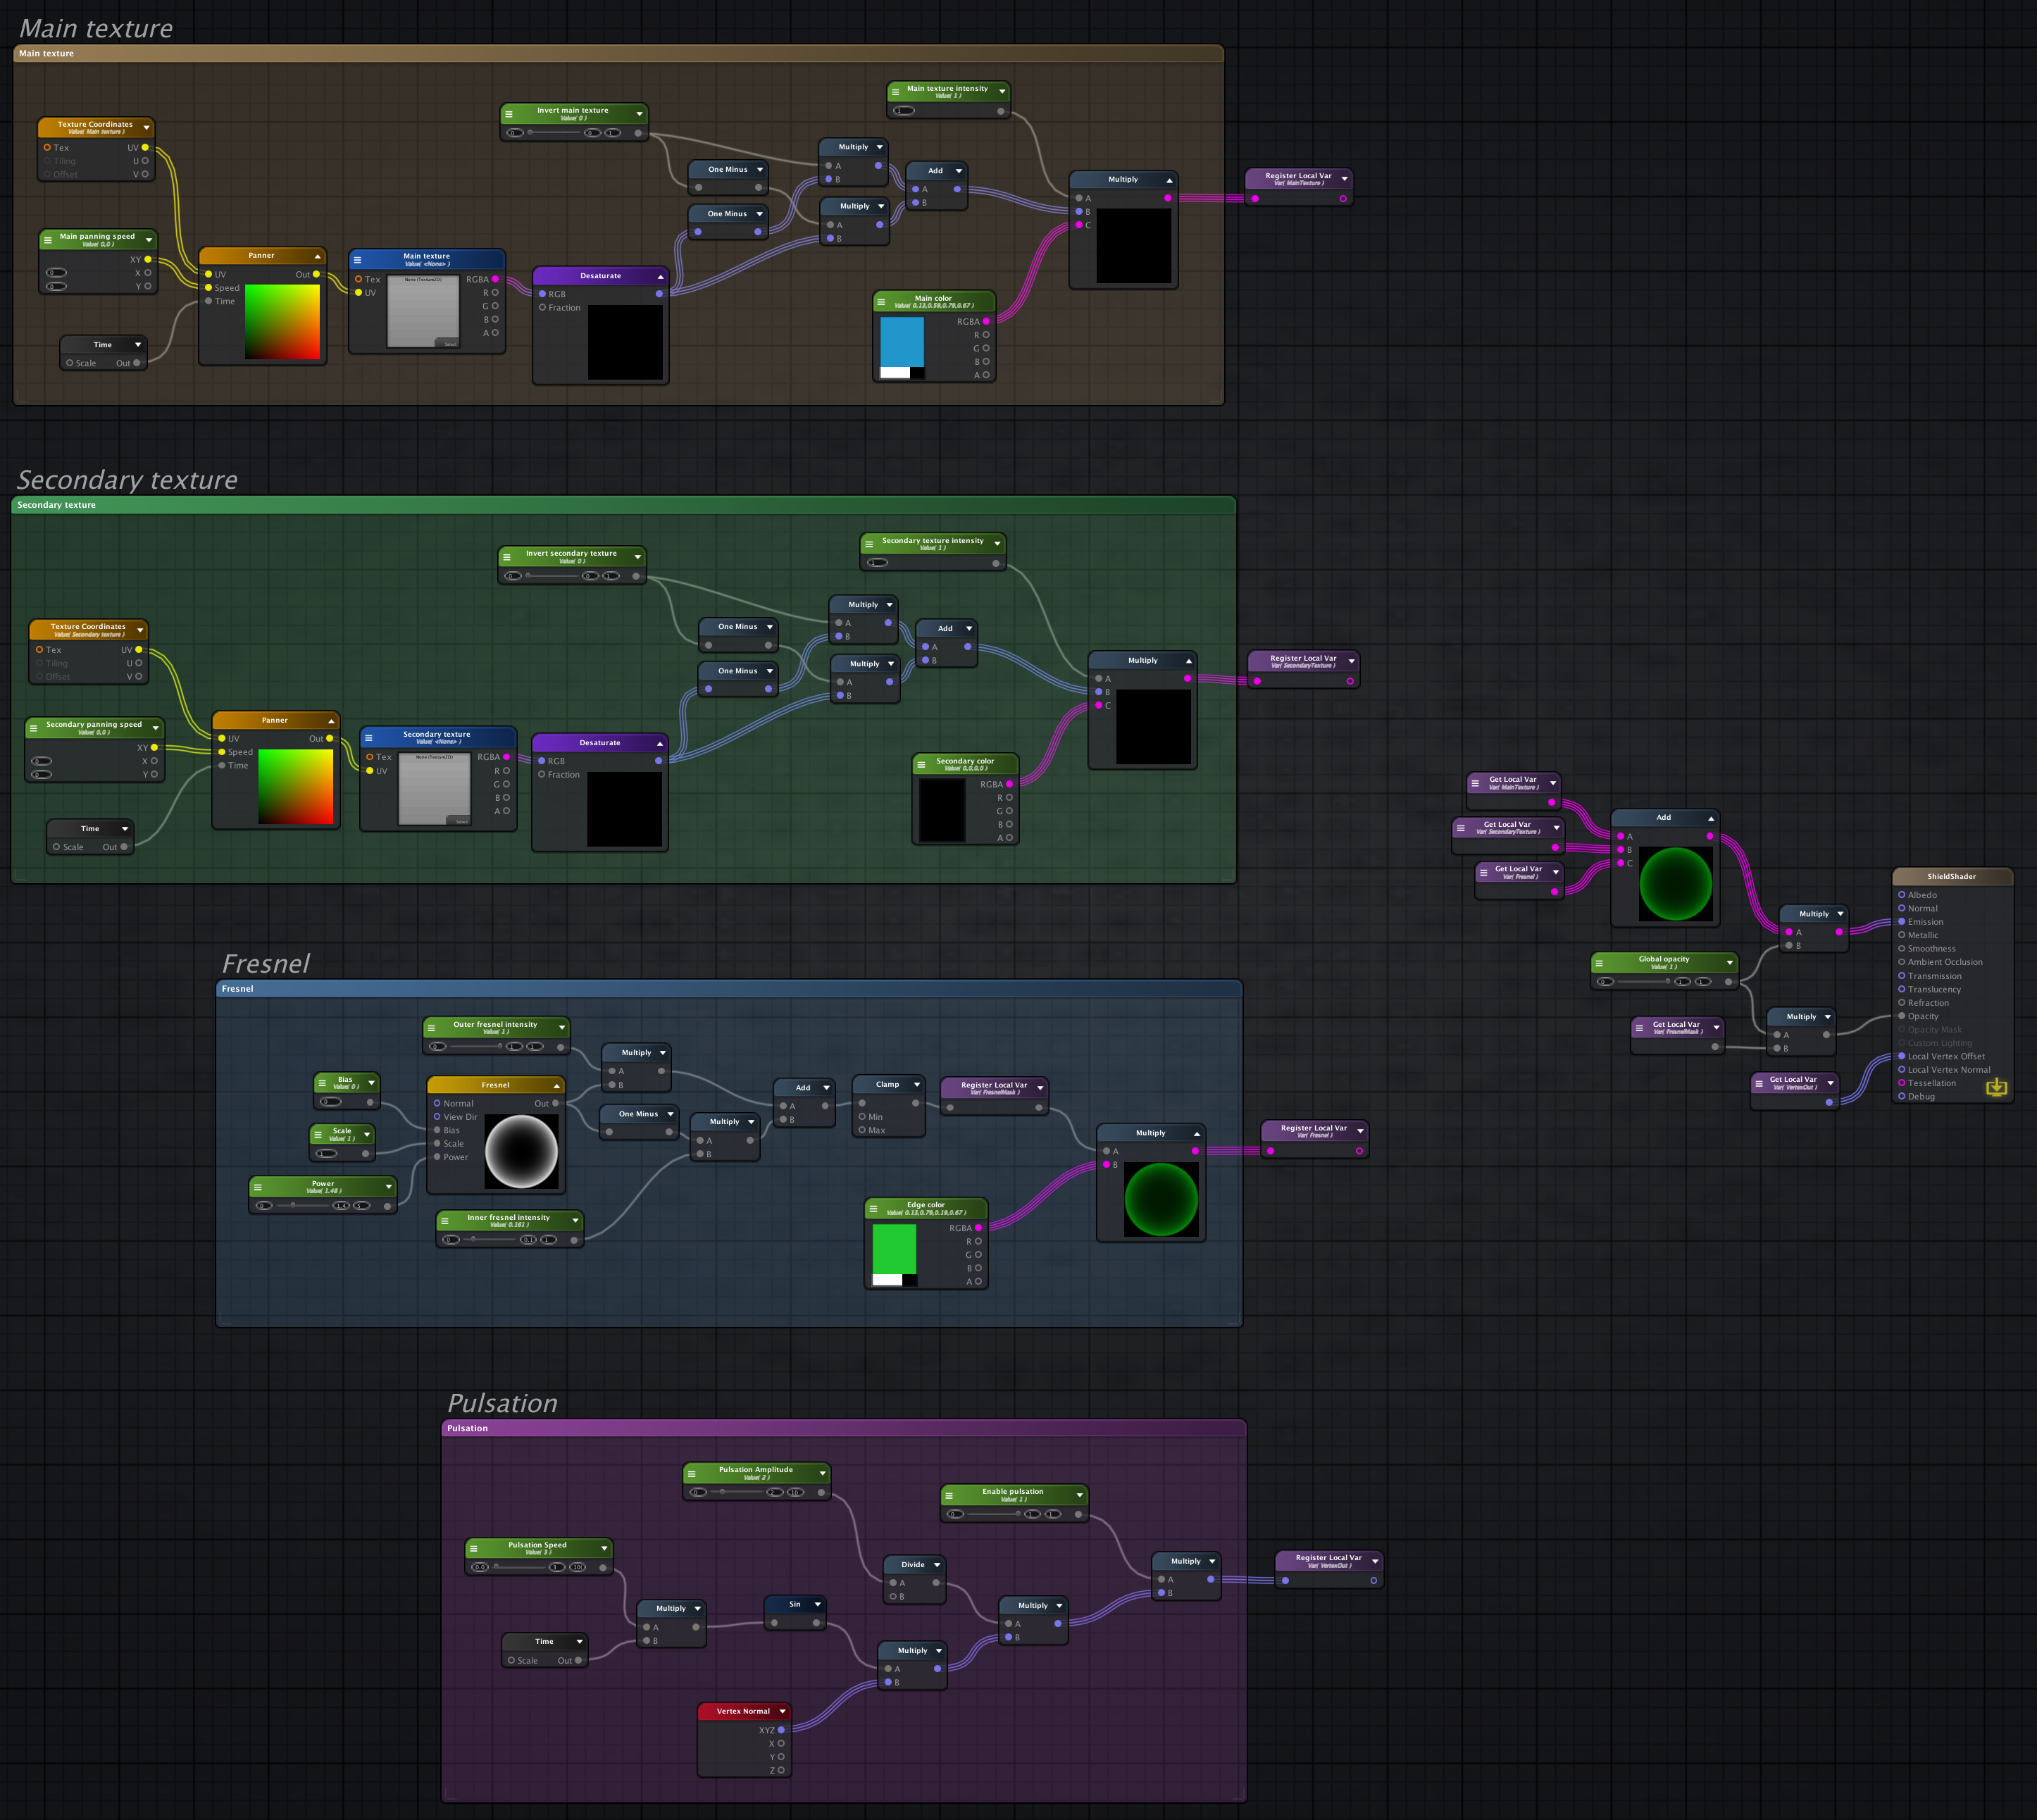
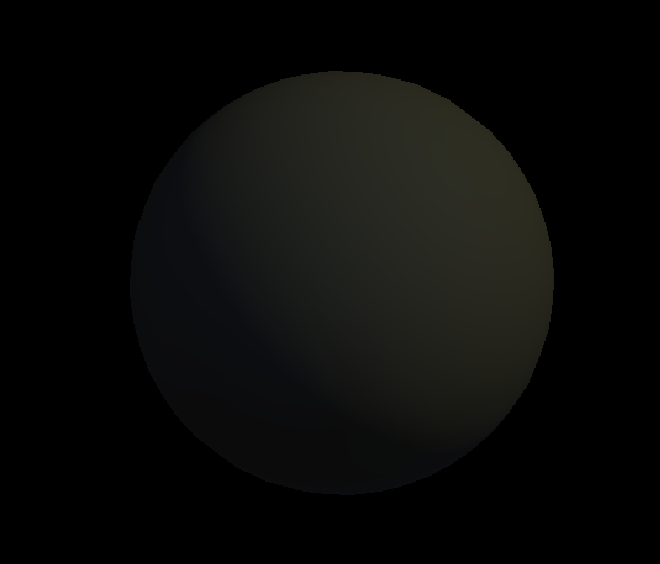
Now we’ll break it down and cover it piece by piece. First let’s look at textures are done. We’ll start with an empty 3D sphere and work on from there. I created an empty ASE shader and slapped it on a sphere.
Texturing
Here’s how we can apply a texture. The explanation on how it works is below.
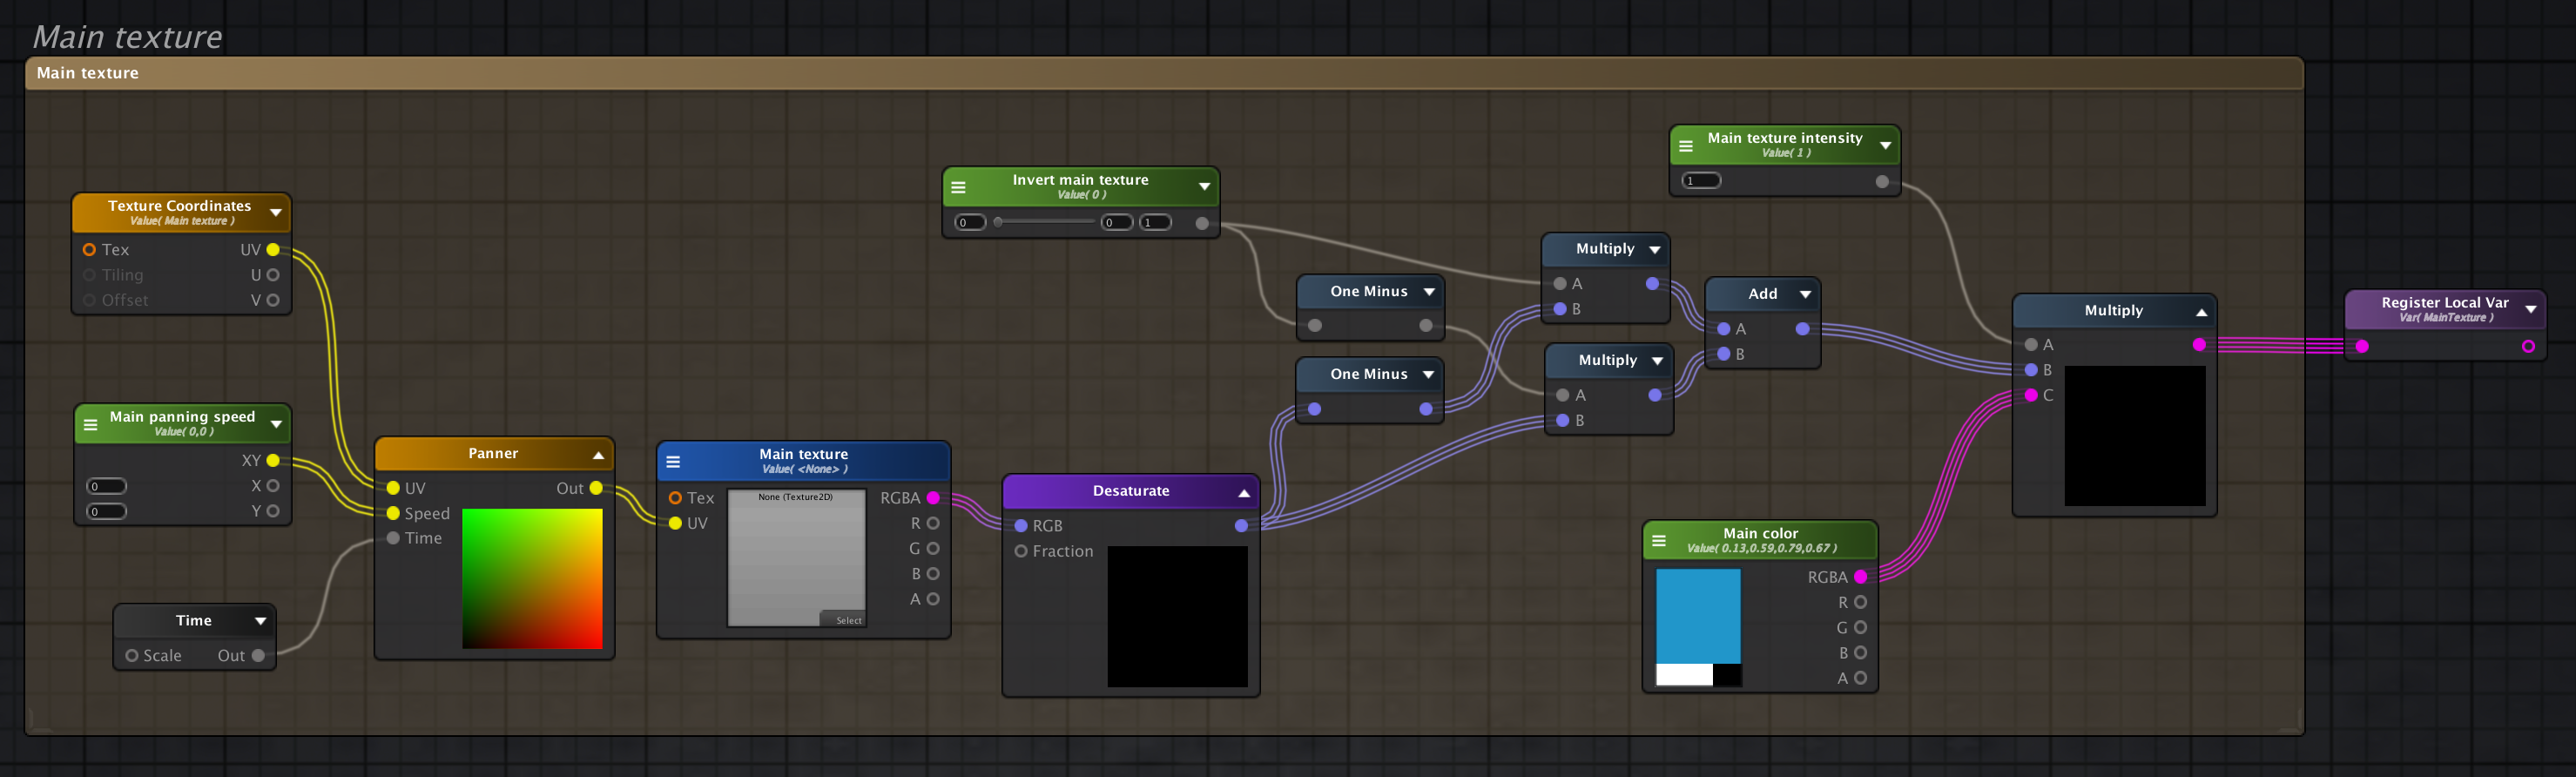
I find it easier to explain this by going in reverse ie. from output towards inputs. We output the value we get from the last multiply block into a variable called MainTexture, we’ll see what that does later. The multiplication takes three parameters. The first one (parameter A) is the intensity of the texture (from 0 to 1). This one is pretty simple to understand, if we set 0 as the value the entire output will be zero and if we set it to 1 the output will be whatever the other two operands are. Operand C is the color. This is used as a tint for the texture. It works the same way as intensity does but it can manipulate per single color channel (R, G, B and A).
Some more magic happens in the B channel. First let’s take a look at the arithmetic logic in the blue ellipse. To put it simply it’s used as a sophisticated if if the texture should be inverted. Inverting means that we use white (1.0f) instead of black (0.0f) and vice versa, values in between are interpolated equally but usually don’t make much sense. To understand exactly how it works let’s go from the Invert main texture input. Its output is used in two other blocks. One Minus blocks is a output = 1 - input and the value coming in can range from 0 to 1. So the two outputs are just inverses of each other, when the Invert main texture value iz 0 one multiply input will be 0 and the other will be 1. When multiplying we will basically take just one of the blocks and pass it forward. If we use a value between 0 and 1 we get an interpolation which again isn’t very useful beyond just stylizing the effect some more. The Desaturate output is again done the same way as Invert main texture so that we have two complements of the texture. The desaturate block itself does just a simple converting a RGB image to grayscale where every component has the same value because we use Main Color to tint our texture so we don’t want any other colors coming in. If we removed this block we could have two colors mixing. Main texture is an input for the texture we’ll be using and another important thing to notice is the UV input. I won’t go into what UVs do but you can find more info here. We use UVs to get a nice texture panning effect that is done with the Panner. A textured sphere can be seen in the example below.
Secondary texture is exactly the same as the main one and it’s just to allow for two textures to be applied simultaneously. An exapmple of two textures at once is a nice scanning effect shown below.
Fresnel
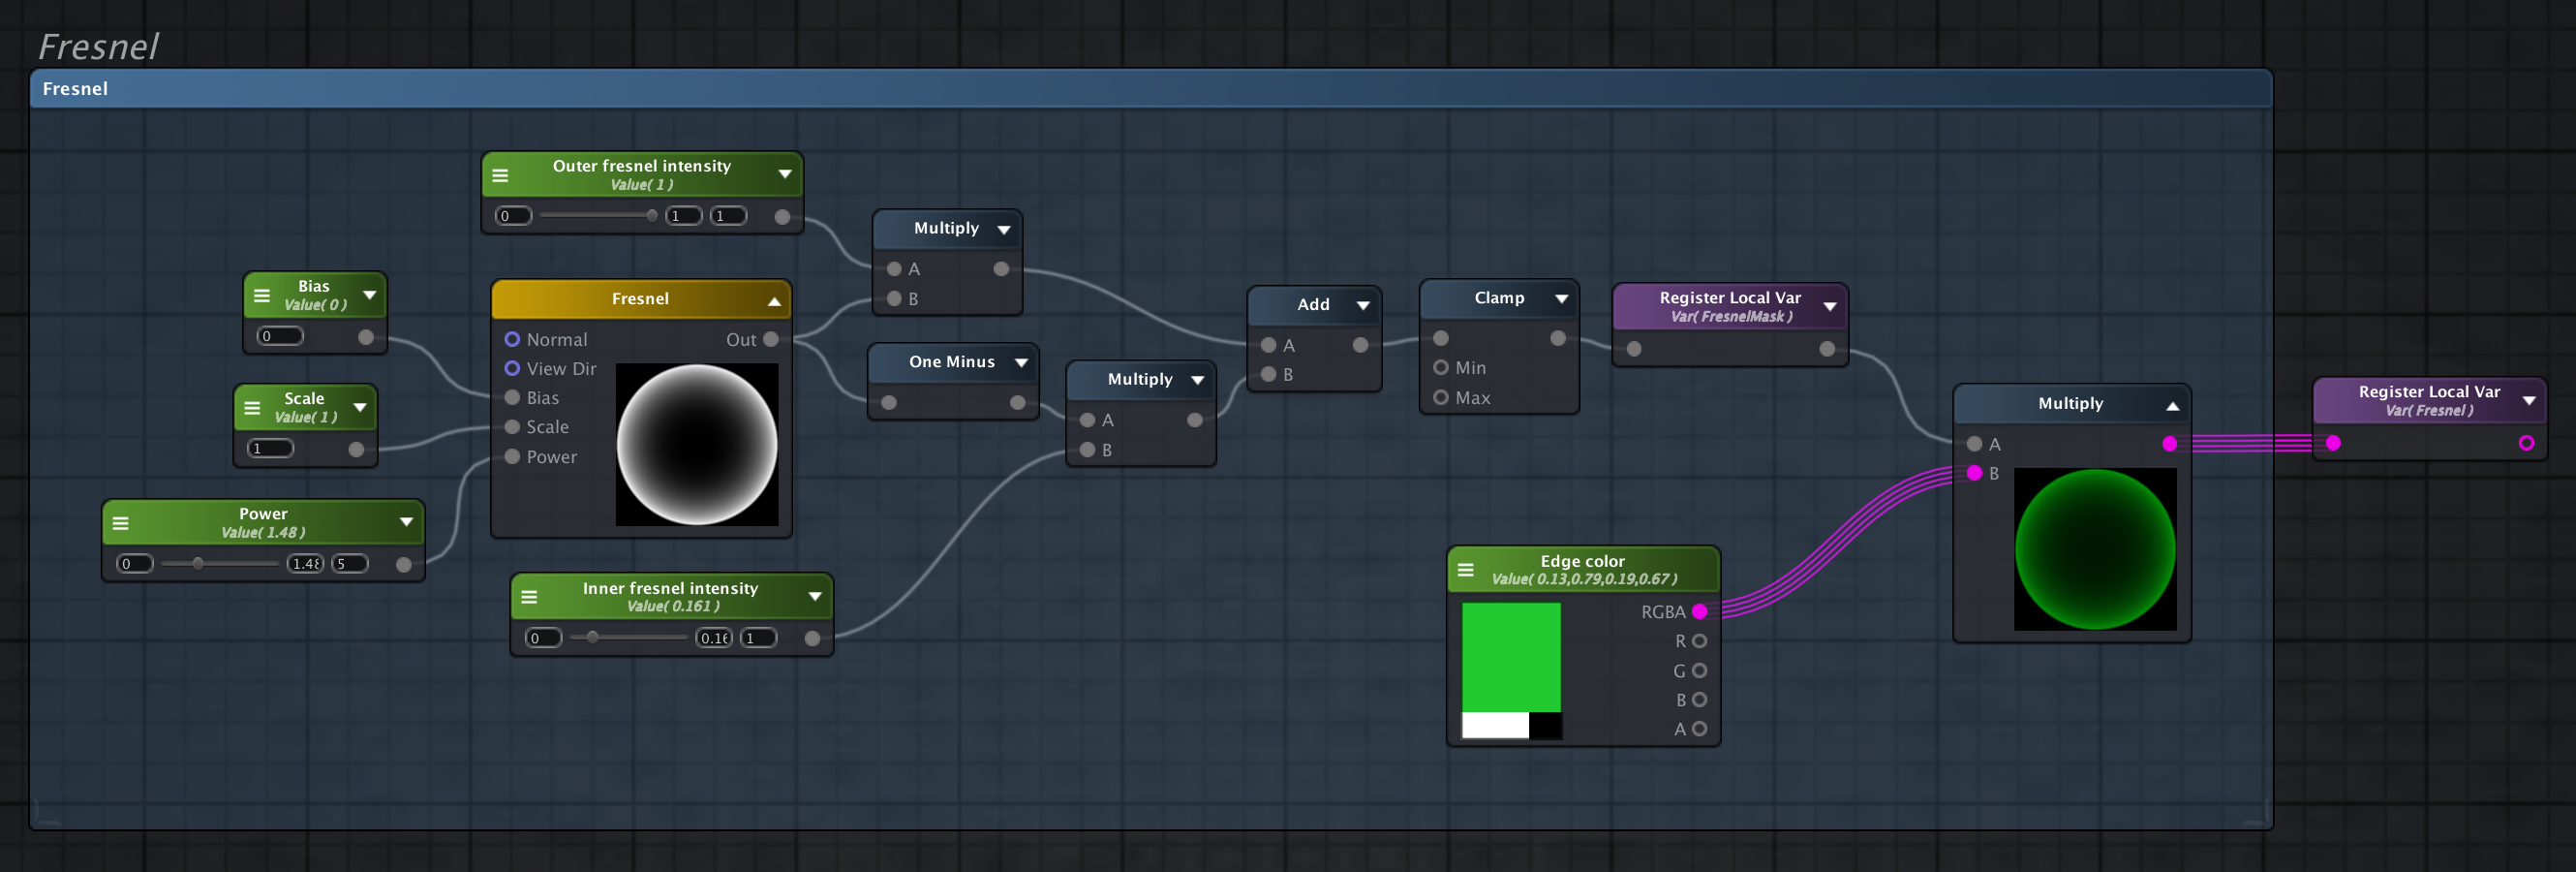
To make shield transparent and visible in the edges we could use the Phong reflection model described in one of my previous posts. We could use the vertex normal and the camera direction and if the two are perpendicular have no transparency and if they are parallel have the fragment invisible. But there is a more elegant solution built into ASE called a Fresnel effect. More info about how and why fresnel works can be found on Fresnel Equations wikipedia page.
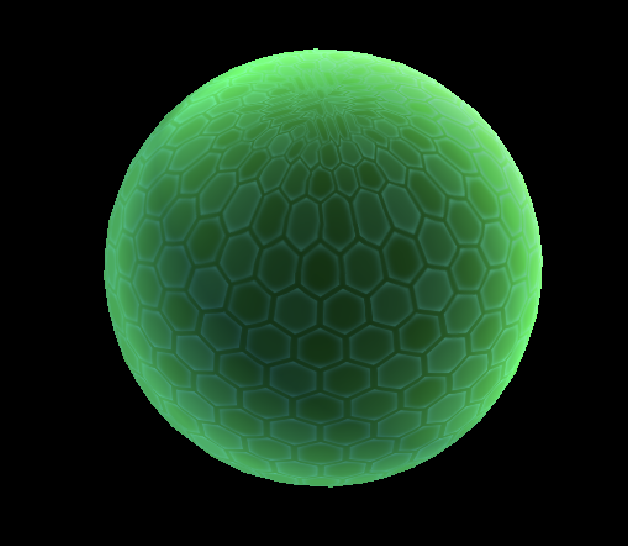
By adding a Fresnel block into our shader we almost immediately get the effect we’re looking for. All the variables are mostly used for stylizing the effect. Let’s go backwards as we did on textures. You shouldn’t be surprised to see another multiply block at the end that takes a color and something else. The color is used for tinting our fresnel effect. The intensity sliders are this time divided into Outer fresnel intensity and Inner fresnel intensity they work the same way as the texture intensity but with the exception that they tweak outer and inner fragments of our shield respectively. Looking at the output of the Fresnel block we see that we have a white edge with a black center. White denotes that the values are 1 and black denotes that the values are 0. Multiplying the normal output with an intensity will tweak areas where values are greater than 0 (outer parts). By using the One Minus block again we can invert the image and tweak inner fragments (the inner fresnel inntensity). Inputs into the fresnel block are explained here.
Pulsation
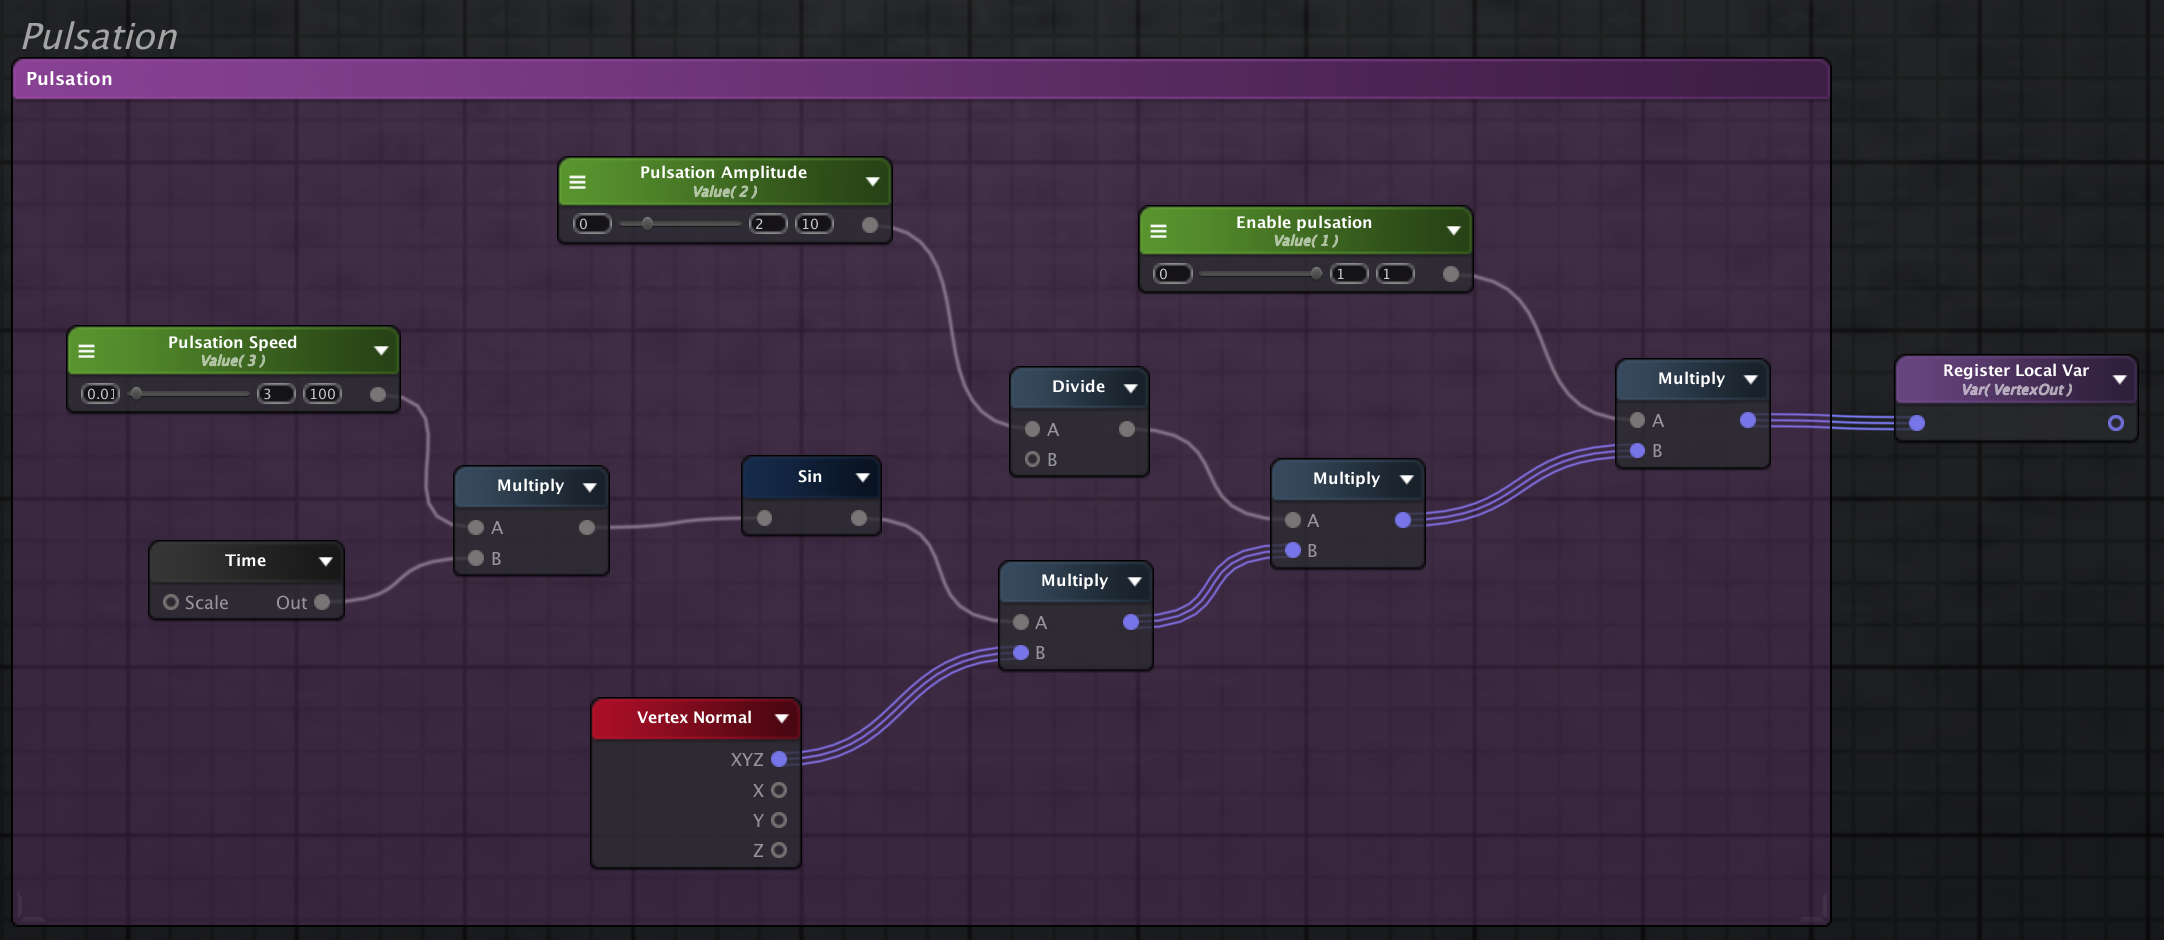
We also want our shader to pulse so that it looks more dynamic. We can do that by moving the vertices along their normals. We use the Enable Pulsation variable to toggle the pulsation effect. How this is achieved shouldn’t be a surprise at this point. Now in order to move a vertex along it’s normal we need the normal which we can get from the built in Vertex Normal block. To move the vertex we use a sine wave of the time that is multiplied by the speed at which we want to perform pulses.
Putting it together
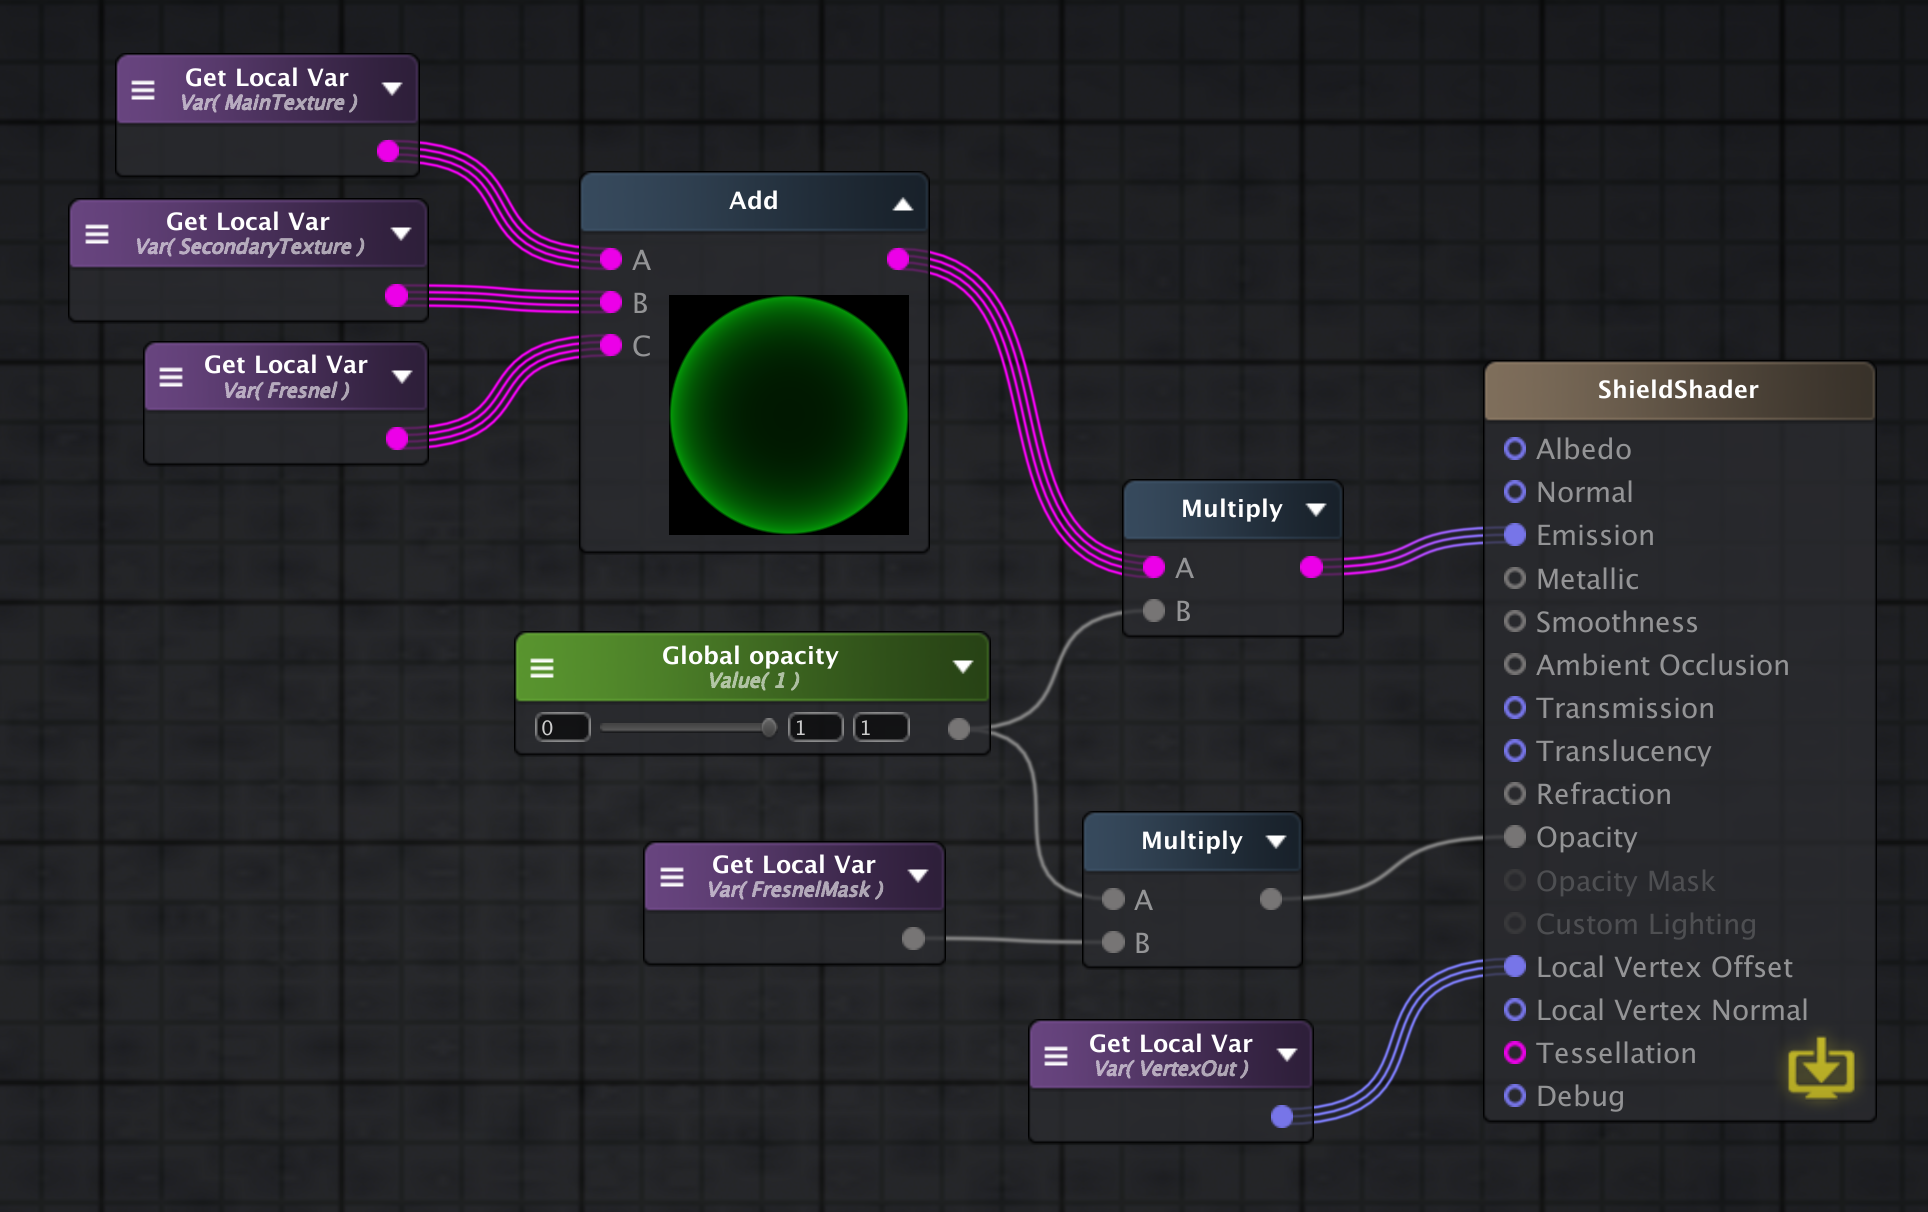
Connecting the elements together is pretty simple. We use the textures and fresnel as the albedo color of our shader. We also use fresnel to determine where the material should be transparent. We add a float to allow for some additional transparency customization. That is then connected into the Opacity input. And the pulsation output is used as the Local Vertex Offset to offest the vertices giving us a nica pulsation pattern.
Conclusion
We have managed to produce a nice effect that is not limited to just spheres. We can use it as a force field, a shield or any other stylized effect. ASE also simplifies things quite a bit with providing some out of the box blocks such as Fresnel, Desaturate, and Panner. The code for the shader is available below. You can edit it in ASE.
The shader is inspired by AdultLink’s HoloShield whish is a similar shader but on steroids. It does however lack support for mobile devices which was crucial in my case.
Code
The code is available on my Gist at https://gist.github.com/JanHalozan/dc61791c0f7018cd8a1cae46c9cf148f.